IBM
This How-To guide is going to focus on how to integrate Lenses with the IBM managed Kafka service known as Event Streams [1].
Some features are not available with Event Streams, namely ZooKeeper and the JMX ports on the Kafka brokers - these are not required to run Lenses.
View the IBM documentation https://ibm.github.io/event-streams/about/overview/
Service Credentials
The service credentials contain information we will use to configure Lenses.
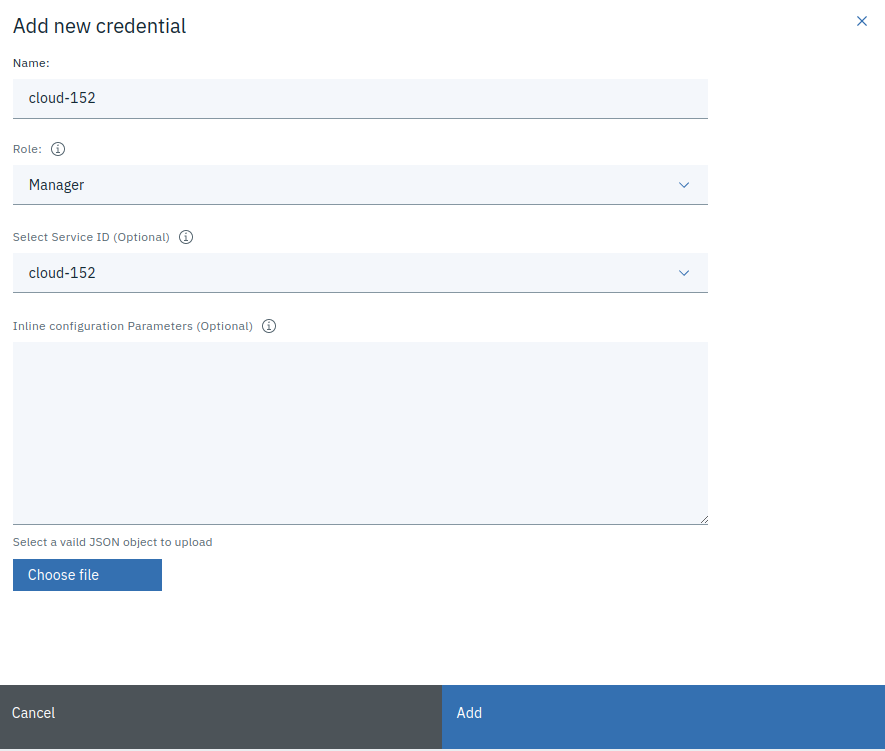
Create a set of credentials:
Note
Wizard to create service credentials in event streams
and save the JSON blob for later. Note the values for “api_key” and “kafka_brokers_sasl”, as these will be used to configure Lenses.
Note
We’ll be using the api-key and kafka-brokers-sasl.
Create a Virtual Instance
See the Hardware & OS requirements for Lenses.
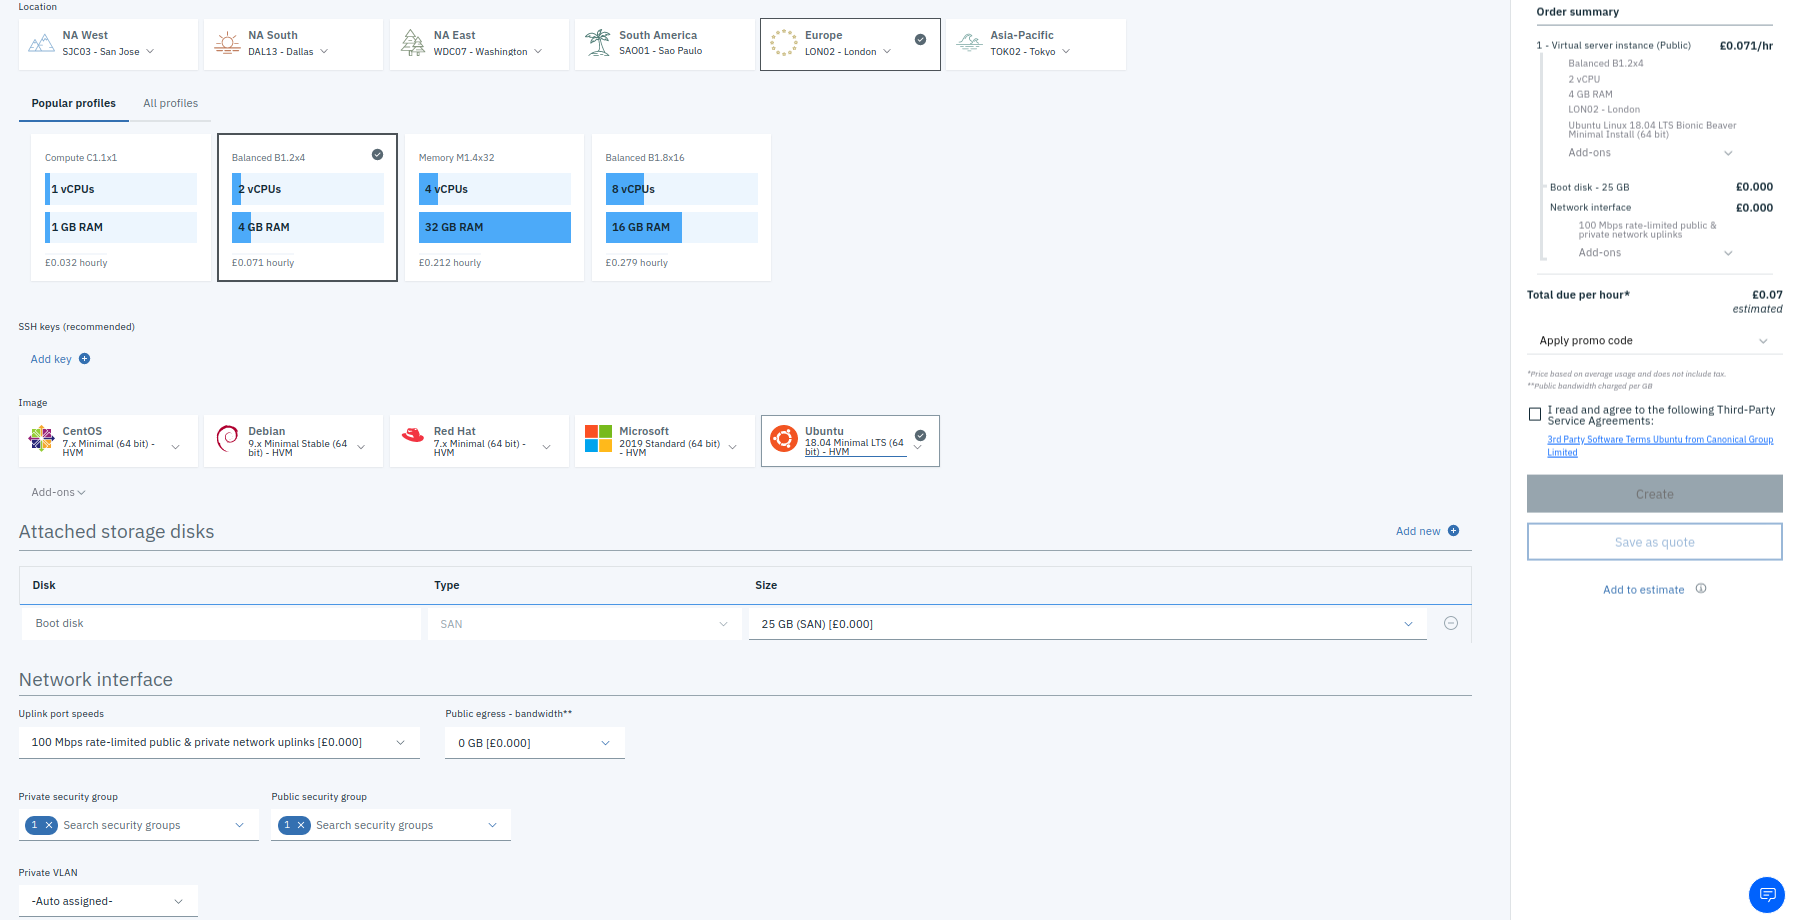
We used a server with the following characteristics:
- 4 vCPU
- 8 GB RAM
- 25 GB Disk
- Ubuntu Linux 18.04 LTS Bionic Beaver Minimal Install (64 bit)
Note
Example options for the server configuration used in this guide.
Once the virtual server has finished booting, alter the /etc/resolv.conf if necessary, and check internet connectivity by updating the software:
apt update
Note
When creating the instance we found that we had no internet access. This turned out to be a problem with the /etc/resolv.conf settings. See this article for more information. https://bugs.launchpad.net/ubuntu/+source/resolvconf/+bug/1817903 Removing the symlink and changing this to nameserver 8.8.8.8 fixed the problem. Still having problems? - double check your security groups.
Install Prerequisites
For this guide we used the archive of lenses. Download the latest version of lenses, from https://archive.lenses.io/lenses/. Or run the script below to download Lenses and initialize the config.
export LENSES_BASE_VERSION=<base-version>
export LENSES_VERSION=<specific-version>
wget -qO- https://archive.lenses.io/lenses/$LENSES_BASE_VERSION/lenses-$LENSES_VERSION-linux64.tar.gz | tar -xvz -C /opt
export LENSES_HOME=/opt/lenses
mkdir -p $LENSES_HOME/data/storage
touch $LENSES_HOME/lenses.conf
touch $LENSES_HOME/jaas.conf
touch $LENSES_HOME/license.json
touch $LENSES_HOME/security.conf
export LENSES_OPTS="-Djava.security.auth.login.config=$LENSES_HOME/jaas.conf"
cd $LENSES_HOME
Create configuration
A minimal config to run Lenses with event streams requires 4 files:
- lenses.conf
- license.json
- jaas.conf
- security.conf
Running the above script will have created these 4 files for you. Now simply populate them with the following content:
lenses.conf
# Set the ip:port for Lenses to bind to
lenses.ip = 0.0.0.0
lenses.port = 9991

# License file allowing connecting to up to N brokers
lenses.license.file = "/opt/lenses/license.json"

# Directory where Lenses stores local storage.
# If omitted it will create a directory named 'storage' under the current directory.
# Write access is needed as well as surviving between upgrades.
lenses.storage.directory = "/opt/lenses/data/storage"

# Set up infrastructure end-points

# The more brokers you can add here, the better
lenses.kafka.brokers = "SASL_SSL://BROKER_HOST_NAME:9093"

# client settings
lenses.kafka.settings.client.security.protocol="SASL_SSL"
lenses.kafka.settings.client.sasl.mechanism="PLAIN"
lenses.kafka.settings.client.ssl.protocol="TLSv1.2"

# Processor Mode & State dir options
lenses.sql.execution.mode = "IN_PROC"
lenses.sql.state.dir = "/tmp/lenses-sql-kstream-state"
Substitute the lenses.kafka.brokers configuration option with value the kafka_brokers_sasl array values, from the service credentials. Make sure to concatenate the values with a comma, and prepend them with SASL_SSL://.
# The more brokers you can add here, the better
lenses.kafka.brokers = "SASL_SSL://BROKER_HOST_NAME_1:9093,SASL_SSL://BROKER_HOST_NAME_2:9093"
license.json
Populate this file with the JSON blob from your license.
{
    "source": "Lenses.io Ltd",
    "clientId": "CLIENT_ID",
    "details": "Lenses",
    "key": "KEY"
}
jaas.conf
Substitute the USERNAME/PASSWORD variables with the respective options supplied in the Event Streams service credentials. (See the previous screenshot on service credentials)
KafkaClient {
  org.apache.kafka.common.security.plain.PlainLoginModule required
  username="USERNAME"
  password="PASSWORD";
};
security.conf
You can change the default Lenses username and password with the following configuration:
lenses.security.user = "admin"
lenses.security.password = "admin"
Login
Finally navigate to the IP address of the virtual server on port 9991 with your browser, and log into lenses.


